ChibiOS/RT is a portable real-time operating system (RTOS) designed for embedded applications. Although the Raspberry Pi is typically used with the Linux operating system, it's not necessarily the best choice for applications requiring low latency, predictable response to external events. Even if you don't have an application with these requirements ChibiOS/RT can be useful for learning about embedded operating systems and related topics like cross compilation, thread context switching, concurrency control, interrupt processing and device driver development. The code base is much smaller than Linux and therefore much more approachable and easy to understand. Another benefit is that the operating system and it's applications can be run on other hardware, like the Arduino, that don't support Linux.
Here's a short list of ChibiOS/RT features (from the web site):
To avoid any misunderstanding, please be aware that I didn't develop ChibiOS/RT. I've just ported it to the Raspberry Pi and created Raspberry Pi device drivers. At the time of this writing, I've implemented the following device drivers for the Raspberry Pi: Port (GPIO), Serial, GPT (General-Purpose Timer), I2C, SPI and PWM. There are also examples showing how to use ChibiOS/RT to access devices like the following:
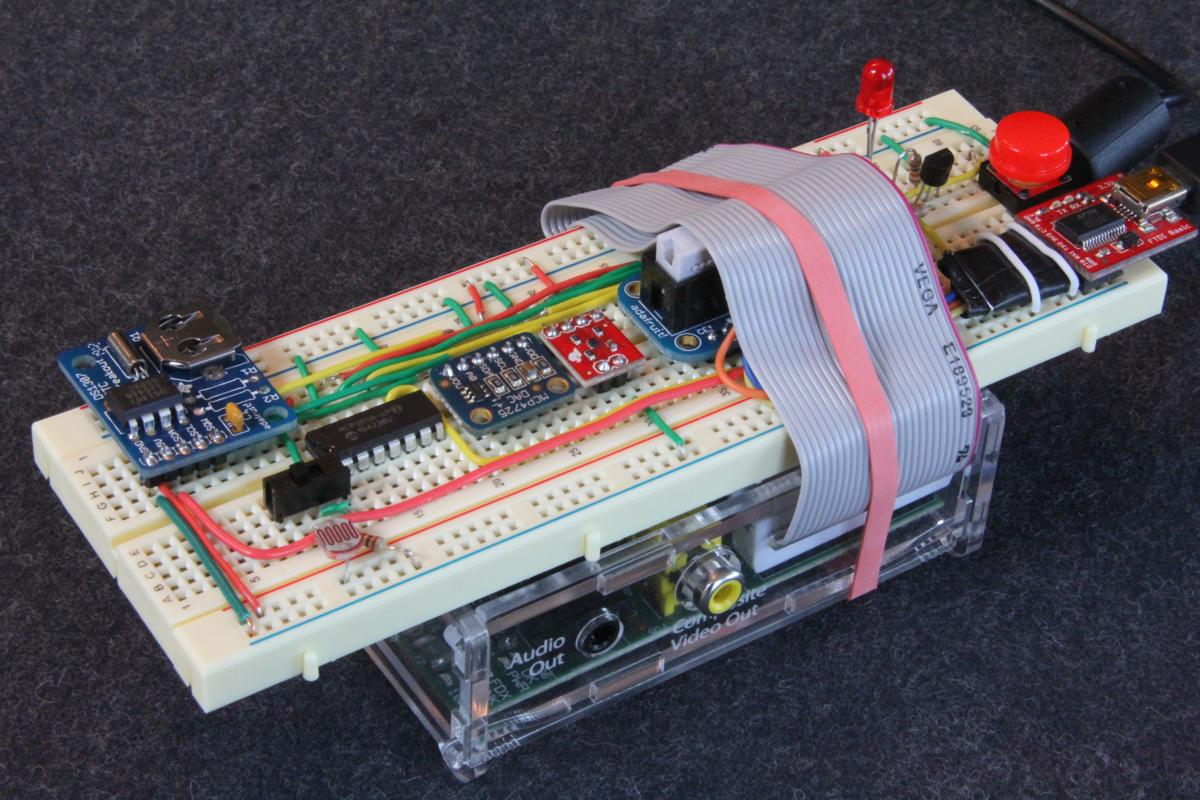
The image above is the breadboard setup I used to test the drivers. The breadboard connector for the Raspberry Pi is the Pi Cobbler Breakout Kit from Adafruit. The case is also an Adafruit product.
So, what do you need to get started with developing applications with ChibiOS/RT on the Raspberry Pi? The following information is based on what I've been doing plus a few things I've heard that other people are doing. This isn't a comprehensive guide to all the development options available.
First, you'll need to know the C programming language and how to work with the GNU make files that are used to build programs. It appears that the ChibiOS/RT core development is done using the Eclipse CDT (C/C++ Development Tooling) as a front end to the compiler and build system. They have instructions on their web site for setting up the Eclipse CDT for use with ChibiOS/RT. However, I've been doing all my work on the command line using Vi and Emacs as editors so Eclipse is not required if you are comfortable with a command line.
Although theoretically it's possible to use the same Pi as both the development computer and the runtime platform by using two SD cards and switching between them, this isn't very effective. Trust me. You'll need a separate computer for compiling code. The computer can be running Linux, OS X or Windows although the tool set you'll use will vary a bit depending on the operating system. I'm using a Mac so much of the following information will be specific to that platform.
After selecting a development computer, install an ARM cross compiler. A cross compiler will compile code for a different type of processor than the one running the compiler. In this case, my Mac will be compiling code for the Pi's ARM processor. The cross compiler I used is Yagarto (Yet another Gnu ARM toolchain). It's free and it's available for Windows and the Mac. On Linux, check whether your distribution has binaries available to install. Another free cross compiler to consider is CodeSourcery Lite. I haven't used it, but others do.
The compiler should be in your shell's executable path. You can type "arm-none-eabi-gcc --version" at the command line to check if the compiler is configured correctly for your environment. If so, it will display the compiler version and copyright information.
Now that the cross compiler is installed, get the source code for the ChibiOS/RT Raspberry Pi port. The code repository is available on GitHub. Clone this repository to a suitable location on your development system.
git clone https://github.com/steve-bate/ChibiOS-RPi
After you've cloned the repository, go to the ChibiOS-RPi/demos/ARM11-BCM2835-GCC subdirectory and type "make". If all goes well, the result will be a ch.bin file in a build subdirectory. This is the file containing the code and data for the operating system and application.
It's important to understand that developing applications with a low-level operating system is quite different than for Linux. With Linux, the operating system runs separately from your application and the operating system kernel is protected from being corrupted by the applications. It also supports any number of applications by dynamically loading them into memory on demand. With an RTOS like ChibiOS/RT the operating system and application are all one program. The operating system is built at the same time as the application. Fortunately, these builds are very fast and usually are just a few seconds long even when building from scratch.
We've built the code. Now let's run the demonstration on the Pi. The demonstration application has several threads. One blinks the onboard led. Another implements an interactive command shell.
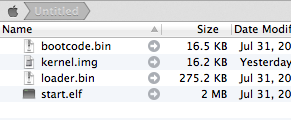
To run the program on the Pi you'll need to prepare an SD card. A small card is fine. The demonstration operating system and application could be deployed on a 4 MB card or larger (that MB, not GB!) so this is a good use for an older card that is too small for other purposes. Use your development computer to format the card using FAT32 (FAT16 seems to works too) and copy the following onto the formatted card: bootcode.bin, loader.bin start.elf and kernel.img (your executable, renamed from ch.bin). You can get these files from another SD card that's already been imaged for Linux or you can get the firmware from the Raspberry Pi GitHub repository (just download the individual files). To repeat, copy the build/ch.bin file to the card but rename it to "kernel.img" Other descriptions of setting up a boot disk are here and here.
You should see the led blinking. If not check what you did in the previous steps. Verify the SD card format is FAT32 and that the correct files have been copied to the card.
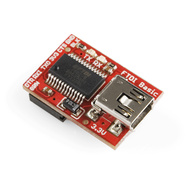
The LED blinks, but what about the command shell? You can't just connect a keyboard and monitor because there aren't yet any device drivers for USB and display devices. However, the shell is there and it's waiting for data on a serial data interface. (By the way, this is the same interface that Linux uses to print kernel messages during the boot process although you usually don't see this.) To connect your development computer to the Pi's serial interface you'll need an adapter. Typically, this will be a USB to serial adapter that also converts voltages to the 3.3 volts the Pi expects. Don't directly connect the Pi to your computer's serial port, the voltage levels will not be correct and you will almost certainly seriously damage the Pi. The adapter I'm using is here (see picture below).
Use male/male jumper wires to connect the adapter to the Pi's pin header. Connect the ground from the adapter to pin 6 on the header. Connect the RX pin from the adapter to the pin 8 (TXD) on the Pi header and connect the TX pin from the adapter the pin 10 (RXD) on the Pi header. (Notice the reversed RX/TX connections.)
When the USB side of the adapter is attached to your development computer, a new serial device should be created by whichever operating system you are using (for example, on Mac OS X, it's named something like /dev/tty.usbserial-AH00S0G5.
So the Pi hardware is connected to the development computer, but now we need a program to view the serial data on the development computer. To do this you'll need a serial terminal program. I'm using ZTerm on the Mac. I've also used the "screen" program with limited success but it didn't seem to work as well as ZTerm for this purpose. If you are using another operating system, you'll need to find a program for that environment.
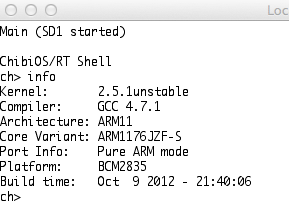
You should configure your terminal program to use 115200 baud, 8 data bits, no parity, 1 stop bit and no flow control and use the serial device described earlier. Remember, you'll probably only see the serial device file if the serial adapter is connected to the computer. After configuring the terminal program, power cycle the Pi and you should see a ChibiOS/RT command prompt from the demonstration program. Type "info" at the command prompt and see what happens. You should also still see the green onboard led blinking.
Well, hopefully this was enough to get you started with ChibiOS/RT on the Raspberry Pi. What's next?
The shell is an optional utility within ChibiOS/RT. It's not a required component of the operating system and it can be removed to make the deployed binary image smaller. In fact, many of the components of ChibiOS/RT can be removed from a specific build to optimize size or speed.
My recommendation is to visit the ChibiOS/RT web site and review the documentation there. There are reference manuals but also some higher level articles discussing various aspects of the operating system. Also take a look at the other examples in the Chibi-RPi/demos directory. These will be for other platforms but the code is mostly portable. There are also several example programs in the ChibiOS-RPi/testhal/BCM2835 subdirectory with examples specific to I2C, SPI and other device drivers. These will show you simple examples of how to communicate between ChibiOS/RT and external hardware devices. In future articles, I'll discuss more details about interfacing to specific external hardware.
You may also want to consider avoiding SD card swapping and rewriting by using a bootloader like the one developed by David Welch. You install the bootloader once on the SD card and then you power cycle the Pi to start the bootloader and transfer your code to the Pi using your terminal program and XModem. There's no need to shuffle the SD card which saves wear and tear on the card and the Pi's card holder. See David's site for more details.